How to Grant Shopify Staff Access (And How to Request Shopify Collaborator Access)
A common question many store owners ask is: "How do I grant Shopify staff access to my marketing team?" or "Where is my Shopify account ID when someone needs it?"
- Find "Users and permissions" in Settings
- Click the "Add staff" button
- Enter the team member's email address
- Click "Send invitation"
Running a successful Shopify store often requires collaboration with marketing agencies, freelancers, or in-house team members. A common question many store owners ask is: "How do I grant Shopify staff access to my marketing team?" or "Where is my Shopify account ID when someone needs it?" This comprehensive guide will walk you through everything you need to know about sharing access to your Shopify store securely and efficiently.
Understanding Shopify Access Types
Before diving into the specifics, it's important to understand the two primary ways to grant access to your Shopify store:
1. Staff Access
Shopify Staff access is ideal for:
- In-house team members
- Regular collaborators
- Employees managing day-to-day operations
2. Collaborator Access
Shopify Collaborator access works best for:
- Marketing agencies
- Freelance developers
- External consultants
- Temporary project workers
The key difference? Staff members count toward your Shopify plan's user limit, while collaborators don't. Choosing the right access type can save you money and provide appropriate permissions.
Where Is My Shopify Account ID? Finding It in Seconds
To easily find your Shopify ID, use this free tool that will give you the original .myshopify URL of any Shopify website in seconds.
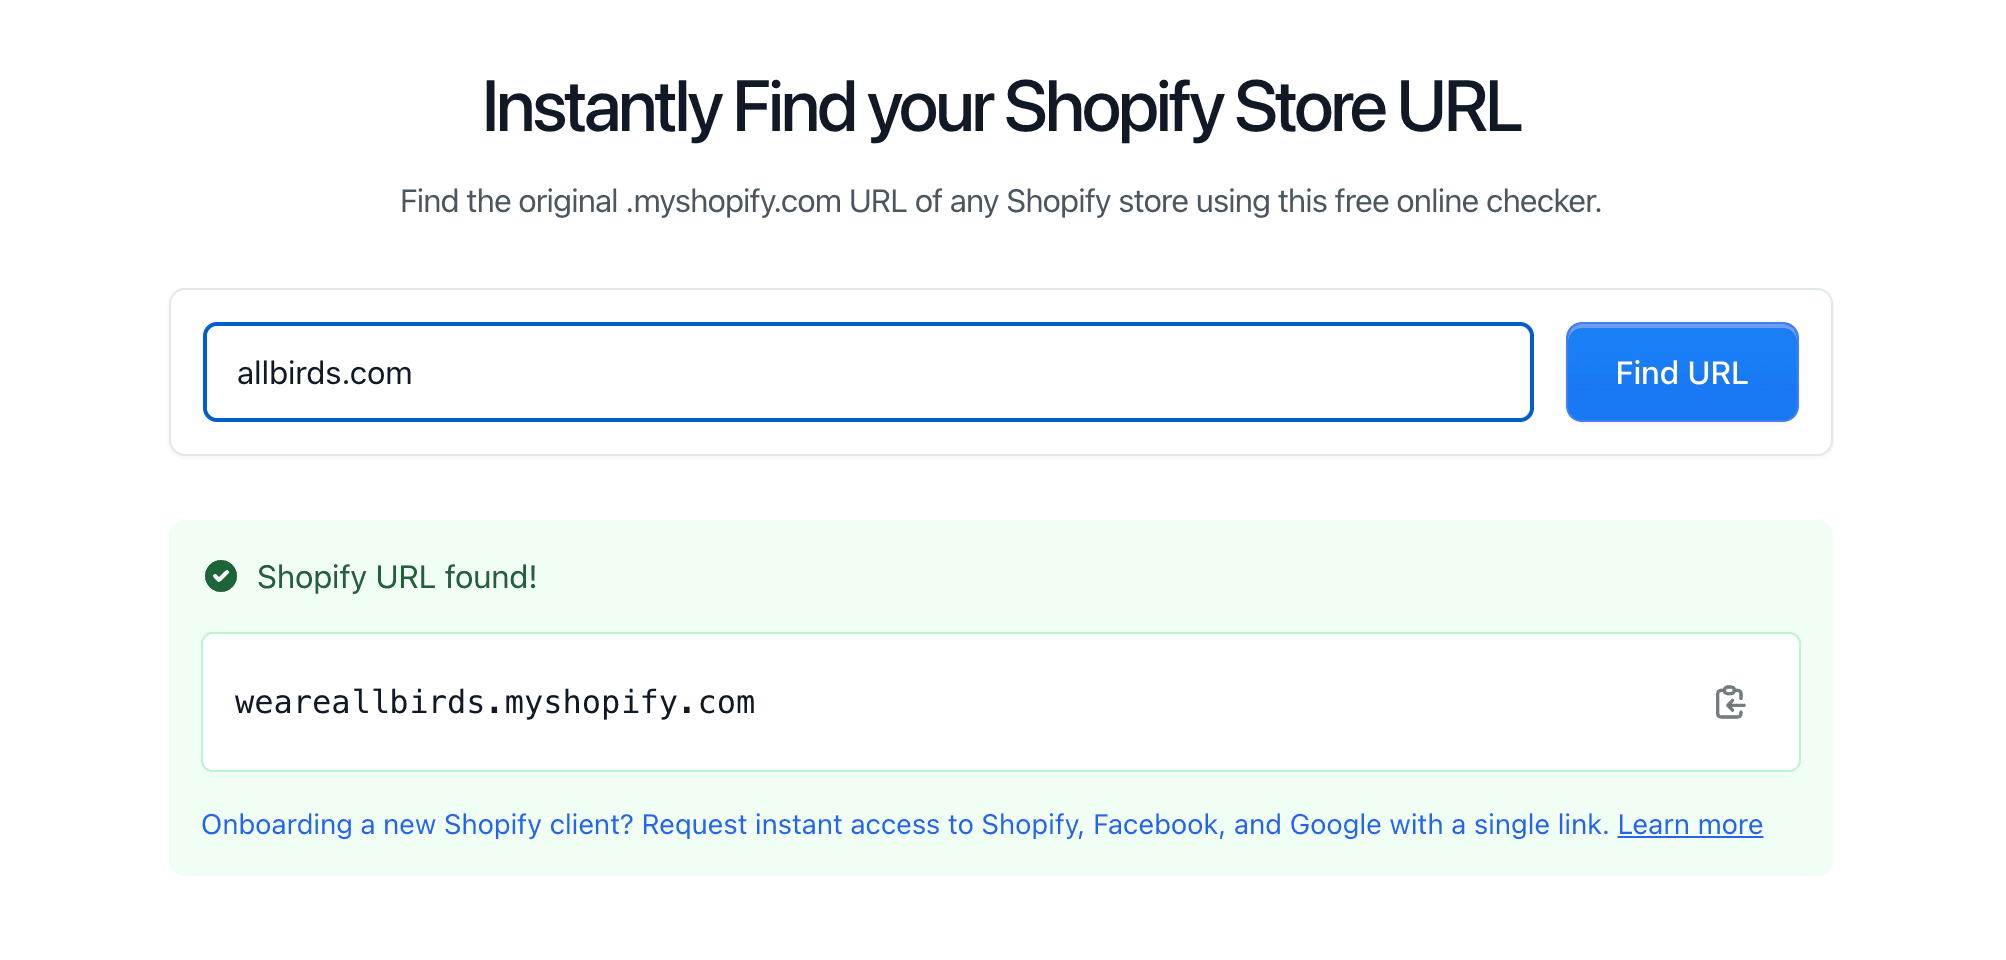
Many marketing agencies will ask: "Where is my Shopify account ID?" Here's how to locate this important information:
Log in to your Shopify admin dashboard
Look at the URL in your browser's address bar
It will appear as: https://admin.shopify.com/store/[your-store-name]
The [your-store-name] portion is your store's unique identifier
This store identifier is what agencies need when requesting access to your store, so knowing where is my Shopify account ID located is essential for a smooth collaboration process.
How to Grant Shopify Staff Access: Step-by-Step Guide
If you're wondering exactly how to grant Shopify staff access, follow these simple steps:
Step 1: Navigate to User Settings
Log in to your Shopify admin panel
Click on "Settings" (located at the bottom of the left sidebar)
Select "Users and permissions" from the menu
Step 2: Add a New Staff Member
This is the core of how to grant Shopify staff access:
Click the "Add staff" button
Enter the team member's email address
Customize their access level (see permission details below)
Click "Send invitation"
Show Image
Step 3: Set Appropriate Permission Levels
When figuring out how to grant Shopify staff access, determining the right permission level is crucial:
Full Access
Grants complete control over your store (use with caution)
Limited Access
Allows you to customize exactly what the user can access:
- Products and inventory
- Orders and fulfillment
- Marketing campaigns
- Blog and content
- Analytics and reports
- Store settings
For marketing agencies, limited access is typically the safest option.
Collaborator Access: The Alternative to Staff Access
If you're working with an external marketing agency, collaborator access might be more appropriate than staff access. Here's why:
- Doesn't count toward your staff limit
- Specifically designed for external partners
- Can be easily managed through the Partner Dashboard
- Provides granular permission control
How Marketing Agencies Request Collaborator Access
When an agency needs access to your store, they'll follow these steps:
Log in to their Shopify Partner account
Request access to your store using your myshopify URL

Quick tip: Use our free tool to instantly find the original myshopify URL
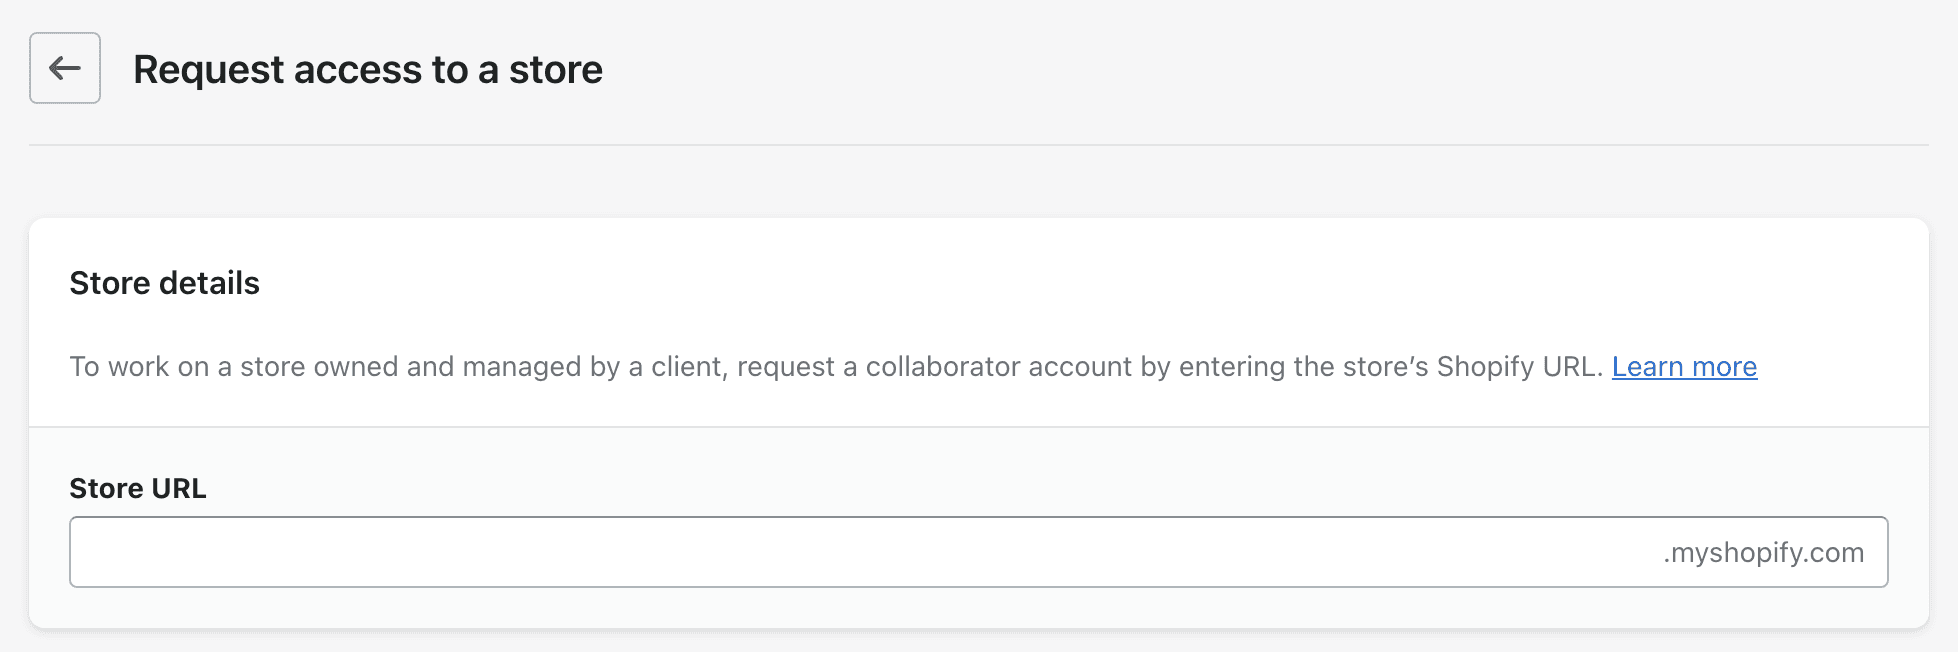
Select the permissions they need
Send the request for your approval
As a store owner, you'll receive a notification and can approve or deny their request.
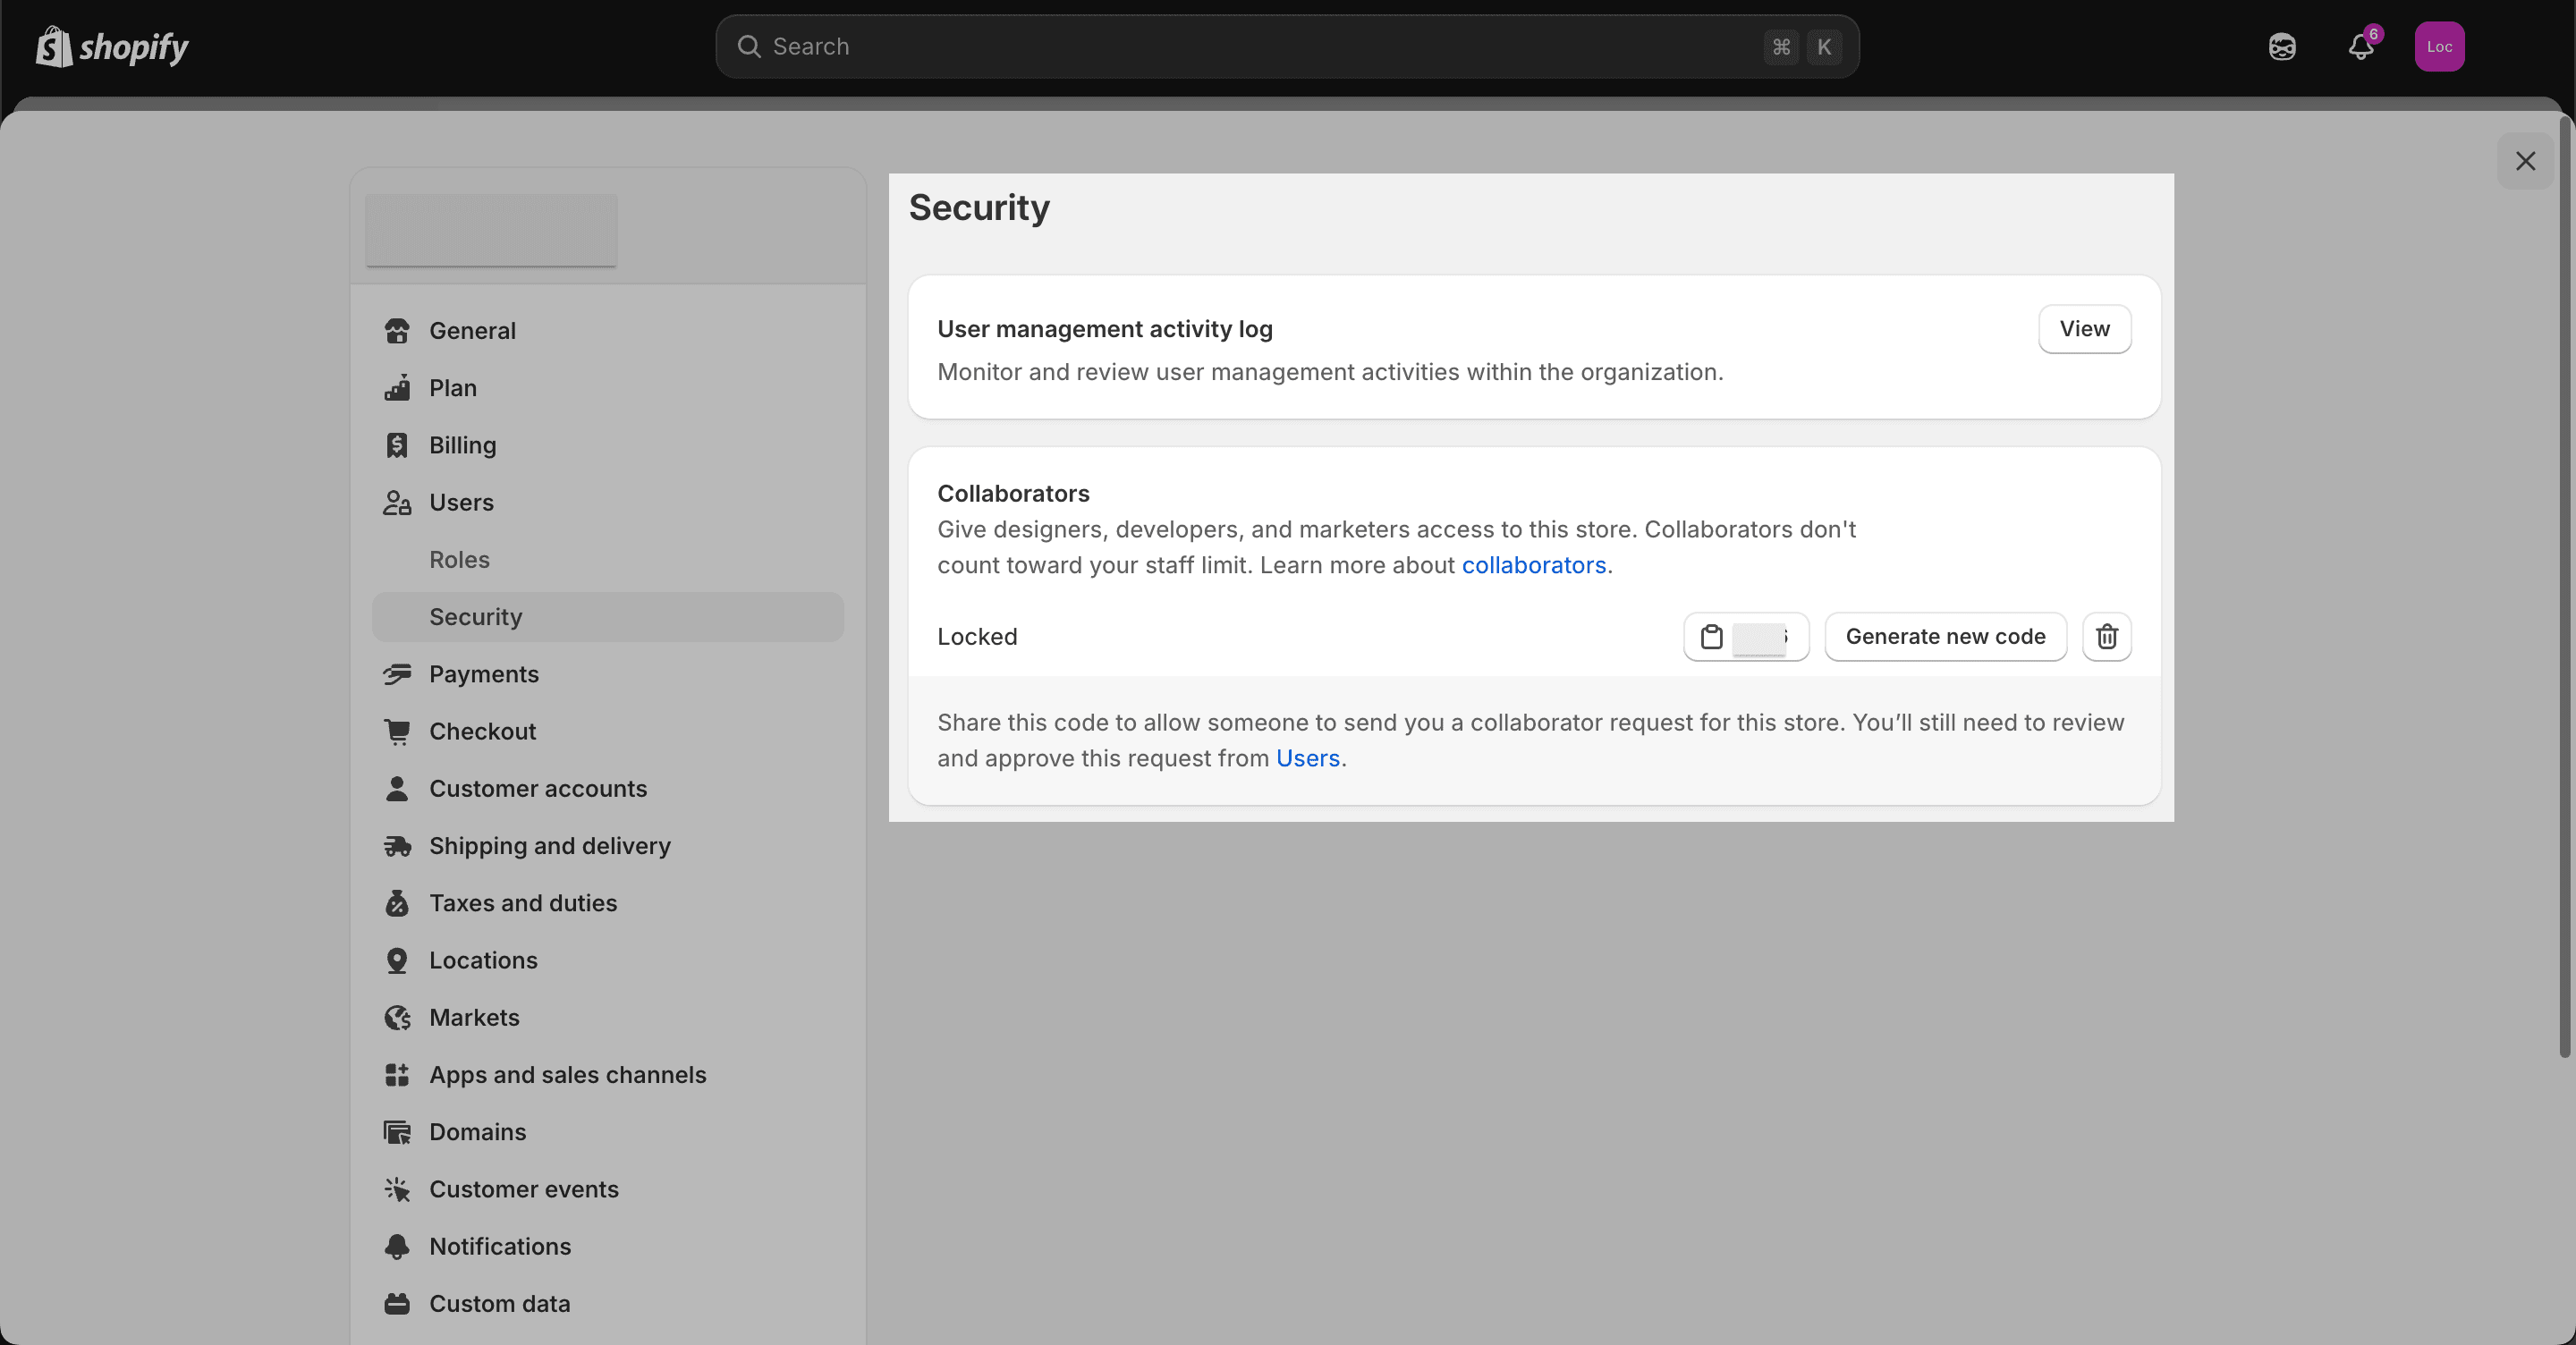
Setting Up a Collaborator Request Code
For enhanced security, set up a collaborator request code:
Go to "Settings" > "Users"
Navigate to the "Security" section
Select "Only people with a collaborator request code can send a request" if visible in your version of Shopify
Generate a new code and share it with your trusted marketing agencies
This ensures only authorized individuals can request access to your store.
Best Practices When Sharing Your Shopify Store
Once you understand how to grant Shopify staff access and know where is my Shopify account ID is, follow these security practices:
Audit Regularly: Review who has access to your store monthly
Limit Permissions: Only grant the specific access needed for each role
Use Time-Limited Access: Remove access when projects end
Document Everything: Keep records of who has what level of access
Enable Two-Factor Authentication: Add an extra security layer
Choose Trusted Partners: Only share access with reputable agencies
How to Revoke Access When Needed
Knowing how to grant Shopify staff access also means knowing how to remove it:
For Staff Members:
Go to "Settings" > "Users and permissions"
Find the staff member
Click the options menu (three dots)
Select "Deactivate account"
For Collaborators:
Go to "Settings" > "Users and permissions"
Navigate to the "Collaborators" tab
Find the collaborator
Click "Remove access"
Troubleshooting Access Issues
Sometimes things don't go as planned. Here are solutions to common access problems:
Invitation Expired: Staff invitations expire after 7 days - simply send a new one
Access Level Too Restrictive: Update permissions as needed in the Users section
Reached Staff Limit: Consider upgrading your plan or using collaborator access instead
The Smarter Way to Get Shopify Access: ClientInvite
Tired of the complicated Shopify access process we just described? ClientInvite.com offers a revolutionary solution that eliminates all the headaches of requesting store access.
How ClientInvite Simplifies Everything:
Create Your ClientInvite Link - Log into your ClientInvite dashboard and generate a custom access link in seconds
Share With Store Owners - Send your personalized link via email, messaging app, or however you communicate
One-Click Approval - Store owners simply click, authenticate, and select permission levels
Instant Access Granted - Start working immediately while ClientInvite handles all the technical details behind the scenes
Why Marketing Agencies Choose ClientInvite:
- Save Hours of Setup Time - No more explaining collaborator codes or walking clients through Shopify settings
- Look More Professional - Impress clients with a streamlined onboarding process
- Enhanced Security - Clients maintain full control over exactly what permissions they grant
- Manage Multiple Stores - Access all your client Shopify stores from one intuitive dashboard
"ClientInvite cut our client onboarding time by 78%. What used to take days now happens in minutes." - @Elias, founder of AdvertisingAgency.com
Beyond Shopify:
ClientInvite also streamlines access to Facebook Ads, Google Analytics, TikTok, and more - all through the same seamless system.
Try ClientInvite Free for 14 Days →
No credit card required. See why hundreds of digital marketing agencies trust ClientInvite to simplify their client access workflow.
Conclusion
Understanding how to grant Shopify staff access and knowing where is my Shopify account ID are essential skills for store owners working with marketing agencies. By following this guide, you can safely collaborate with marketing professionals while maintaining control over your store's security.
Remember that your Shopify store contains sensitive business and customer information, so always be strategic about who receives access and what permissions they truly require to help grow your business.
Have questions about granting access to your Shopify store? Leave a comment below and we'll help you out!